WIP: Floating point in computing, for non-geniuses
May 21, 2026 (updated May 22, 2026)
Disclaimer: While the computer science principles discussed in this article are meant to be accurate, all the devices are fictional, and all the examples are untested and may contain errors. Please exercise due diligence and double-check facts.
If you happen to spot any errors, I’d really appreciate it if you’d let me know by starting a chat with me on Bluesky or by emailing me at artem[at]sensologica[dot]com.
Recently I’ve had to work with floating-point calculations in an app I am developing which made me realize that I really don’t understand the implications of working with floating point well enough to make clear decisions.
In this article I will attempt to explain to myself (and to any readers) floating point in an accessible way because a lot of resources available online are very dense and math-heavy. And as someone who does not have the necessary math and computer science prerequisites, I have to go back to the basics in order to understand things more or less fully.
Let’s get started
If you search online for information about floating point as it pertains to computing, you will undoubtedly find David Goldberg’s influential paper entitled What Every Computer Scientist Should Know About Floating-Point Arithmetic, published in March 1991.
Just as likely, you will also stumble upon IEEE 754, which is the standard that specifies how floating-point arithmetic should be performed on computing devices. Previously, many different implementations existed, so this standard was created to align everybody with regard to floating-point representations and calculations to ensure compatibility.
In theory, these two resources should be enough to understand floating point. If you want to go this route, I wish you good luck!
I, however, simply do not have the mathematical background nor the raw brain power necessary to tackle these resources. That’s why I have to travel back to high-school-level math and computer science and start building up my understanding gradually from there.
Wait, what’s the problem?
On first glance to uninitiated observers it is unclear why floating point math should pose any problem in computing. After all, floating point in math class was pretty simple:
0.1 + 0.2 = 0.3And calculators performed these calculations reliably, without any strange behavior we had to account for.
So what’s all the fuss about?
Well, just because on the surface things look nice and neat, this doesn’t mean that that’s the whole picuture. In reality, there is a lot of complexity hiding underneath what appears to be evident. This complexity has been carefully managed for us by mathematicians, computer scientists, and standards committees so that we get results we expect.
This complexity arises from the fact that there is no simple way to represent decimal numbers in binary.
The decimal system
The math that we are the most familiar with is based on decimal numbers (from Latin decimus, meaning “tenth”). This is known as a base 10 system. Meaning we count from 0 to 9 (although we like to think of it as 1 to 10 because that’s how we count using our 10 fingers) and then we “roll over” to 2-digit numbers like 10, 11, and so on. Once we reach 99 and run out of numbers to count up with, we “roll over” again to 3-digit numbers like 100, 101, etc.
This is why our counting system is also known as positional because, depending on their position, the very same numbers 0 to 9 have different “weights”. In the number 111, the leftmost 1 is not really a 1 but a 100. The middle 1 is not really 1 but a 10. And the rightmost 1 is the only 1 that is actually a 1.
So the rightmost position has a multiplier of 1. The next position to the left has a multiplier of 10. The next position to the left has a multiplier of 100. The next position to the left has a multiplier of 1000. And so on, to infinity.
Let’s take the number 1234.
We can break it down mathematically as follows: (1 x 1000) + (2 x 100) + (3 x 10) + (4 x 1) = 1000 + 200 + 30 + 4 = 1234
We can see that the multipliers follow a pattern that we can express using exponents. A 1 is 10^0. A 10 is 10^1. A 100 is 10^2. And so on.
So, alternatively, we can use exponents to represent the “weights” of each position of our number 1234:
(1 x 10^3) + (2 x 10^2) + (3 x 10^1) + (4 x 10^0) = 1000 + 200 + 30 + 4 = 1234
We get the same result, but the pattern using exponents is now very evident with 10 as the radix and an exponent that increases by 1 with every shift in position to the left.
The binary system
Computers use a different number system than us. While we use the decimal system because we have 10 fingers, computers use the binary system. It’s also known as the base 2 system.
Why? Because fundamentally our computers can only distinguish between two numbers: 0 and 1. In fact they are not really numbers, but rather “states” or “signals” with 0 representing an absence of a signal, and 1 representing a presence of a signal. Just like on-off switches. Two discrete states.
So computers can only really count to 2 (from 0 to 1). This means they run out of numbers very quickly and need to “roll over” to 2-digit numbers (and then 3-digit, 4-digit numbers…) very quickly if they want to continue to be able to count.
TODO: Mathematical representation using exponents.
Representing decimal numbers using binary format
This is the crux of the issue from which a lot of the complexity we’re attempting to unravel in this article stems. How can we reliably translate our base-10 reality to the base-2 reality of computing devices? Well, there are many constraints that make it so that it is impossible to do so without losing something in translation. This is why all of this is ultimately an exercise in making expertly considered tradeoffs. Making these informed tradeoffs and encoding them as standards is exactly what organizations like IEEE do. The IEEE 754 standard does this specifically for floating-point arithmetic, but there are myriad such standards out there in the world, dealing with all sorts of things that are much more complex than they might seem at first sight.
But I digress. So now that we’ve revisited the base-10 decimal and the base-2 binary systems, how can we represent numbers from our base-10 system in the computer’s base-2 system?
Well, we can just count up in binary and see how that maps to our decimal numbers.
| Decimal | Binary |
|---|---|
| 0 | 0 |
| 1 | 1 |
| 2 | 10 |
| 3 | 11 |
| 4 | 100 |
| 5 | 101 |
| 6 | 110 |
| 7 | 111 |
| 8 | 1000 |
| 9 | 1001 |
| 10 | 1010 |
| 11 | 1011 |
| 12 | 1100 |
| 13 | 1101 |
| 14 | 1110 |
| 15 | 1111 |
We can see that we can indeed represent our decimal numbers in binary. The transaltion is not very intuitive at first, but it is logically sound. But one thing is peculiar about the pattern that emerges in the Binary column… Even relatively small numbers like 15 in decimal require 4 numbers to be represented in binary. Binary will require more digits (more data points, more memory) to encode decimal numbers.
Bits in memory
As mentioned earlier, computers store information using 0 and 1. These two numbers are known as bits (short for binary digits). So if some data is encoded using 4 bits we say that it occupies 4 bits of memory. 4 bits are also known as a nibble. 8 bits are known as a byte.
Introducing Sensologica Labs
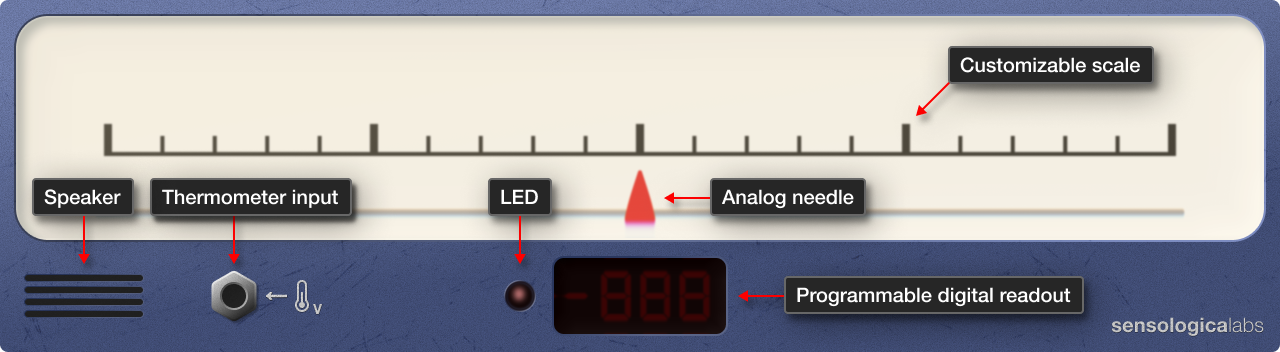
For illustrative purposes (and to make this article more fun), imagine that we are an engineer doing R&D at fictional Sensologica Labs. We’ve been working on a new device for our latest experiment. The device is a gauge with an analog needle and a customizable scale, and has an input that takes voltage from an analog thermometer. The device also has a digital readout that can be programmed to show some number based on the needle’s position, as well as a red LED and a speaker that can be activated when the digital readout shows a specific number.
Let’s continue building!
Ranges
The device was requested by our scientist colleagues at an adjacent biolab, where they are researching a new compound found in the sap of Mediterranean stone pine trees (Pinus pinea) that they have found could be revolutionary for human health and longevity.
The scientists have several baby pine trees in the biolab. The pines are sensitive to tempreature fluctuations and the scientists have determined that the optimal temperature range for them is 158°C. This means that they need to closely monitor the temperature in the biolab and maintain it in the range between 7°C and 23°C.
To make it easier to talk about and work with ranges, in the specs they’ve given us, they scientists expressed this range using mathematical interval notation.
This notation uses brackets [] and parentheses () to denote whether the values within the range are to be included in or excluded from the range.
For example, we can represent our range from 7°C to 23°C as follows: [7°C, 23°C]. If our temperature is x at any given time, then our notation dictates that the permitted values for x are 7°C x 23°C.
If, however, we were to notate our range with parentheses instead of brackets like so (7°C, 23°C), we would dictate that our temperature x must be 7°C x 23°C.
So which case is appropriate for our device? The latter case, with 7°C and 23°C excluded from the acceptable range. Once the temperature reaches 7°C or 23°C we want our device to sound an alarm so that the temperature can be corrected. The moment we touch -8 or +8, we want those alarm bells ringing!
Scales
15°C, +8°C, -8°C, 7°C, 23°C… All these different values. It’s quite confusing.
How should we design the scale for our device so that it is as useful and intuitive as possible for our scientist colleagues?
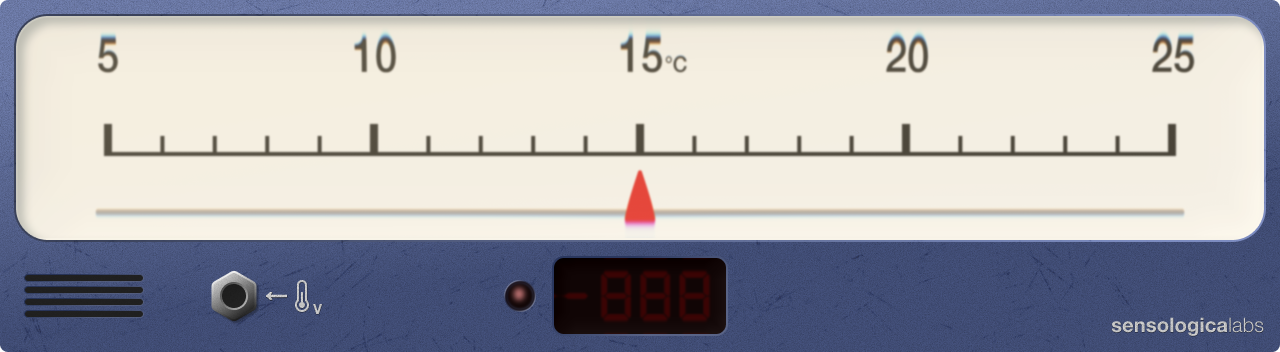
We could make the scale absolute, and show the exact temperature in °C.
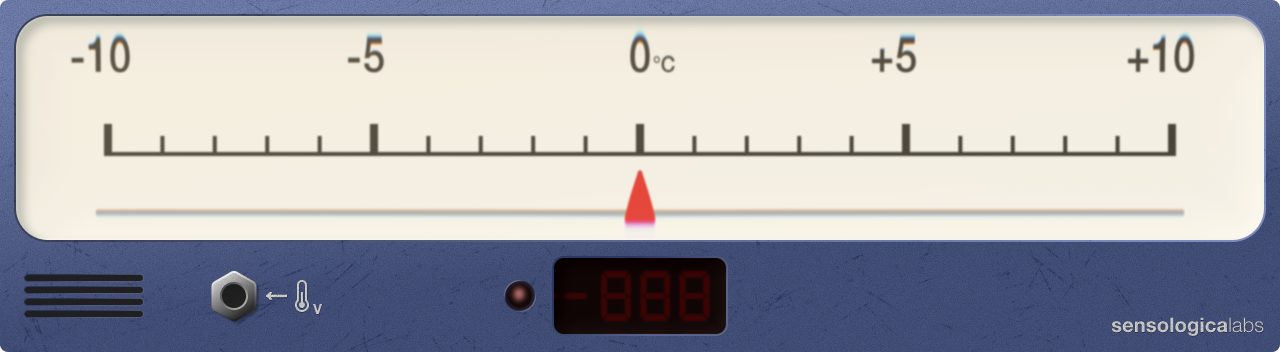
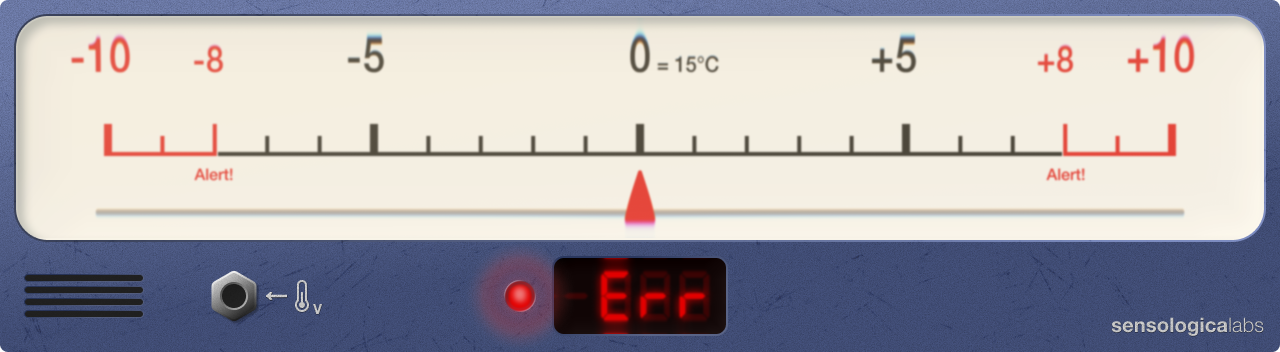
Or we could make the scale relative, and show negative and positive offsets from some reference temperature. On the scale shown below, the 0 is pinned to 0°C, which makes this scale behave in the same way as an absolute scale.
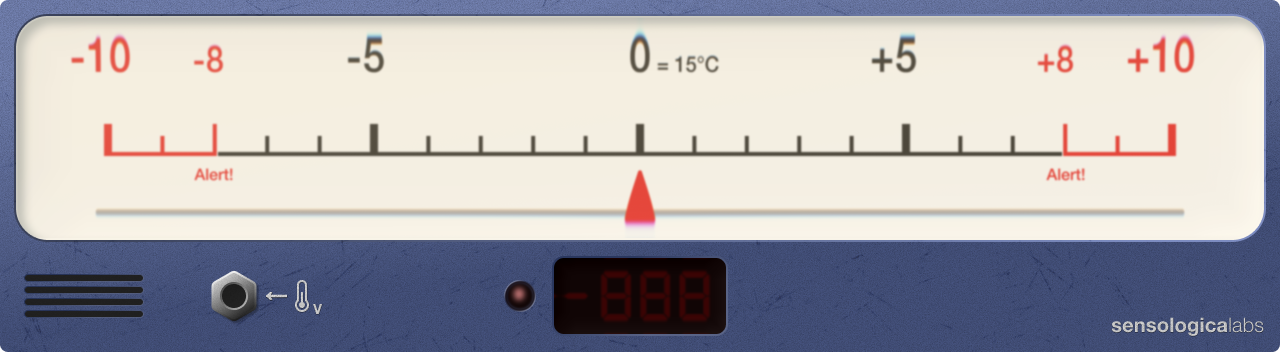
Where relative scales become interesting, however, is when we pin the 0 to some reference value other than its absolute equivalent. Let’s pin the 0 on our scale to our reference temperature of 15°C. Note the label on the scale that shows that 0 is now representing 15°C.

Now, the numbers on the scale no longer represent absolute reality (+5 no longer means that the temperature in the room is +5°C), but represent by how much we’ve deviated from our reference, and in which direction — positive or negative. By using a relative scale in our instrument we can put emphasis on something that might be more important in a given context than absolute reality. In our case, we want to put emphasis on the deviation from the norm because this is what is important to the scientists in the biolab. They are less concerned with being able to read the exact temperature in the lab, but rather they want to make sure that the temperature always stays within the tolerance of 8°C from the reference temperature of 15°C. So for them, a relative scale will be more useful and informative. They will be able to observe when the temperature begins to drift and by how much it does, and in which direction, and will be able to adjust it accordingly. And the instrument will always encorage them to always try to hit the bull’s eye, the optimal point, the big 0 in the center of the scale.
And if really necessary, the scientists will be able to convert the reading from a relative scale to absolute values. All they would have to do is add the value shown by the needle from the reference of 15°C. So if the needle shows -3, then to get the absolute temperature in the room the scientists will simply do 15+(-3) = 12°C. But because this is not the primary use case this device is being built for, absolute reading have been given secondary importance to let deviation take center stage.
This is why we’ve decided to build a relative scale into our device instead of an absolute scale. It’s not an accident — it’s by design.
Finally, to make the scale even more useful, let’s mark in red the extremes of the range which, when reached should trigger an alarm. This will make the purpose of the device even more evident. At Sensologica Labs we proudly build tools that make people’s work easier. So let’s not cut any corners!
Looking good! Let’s plug it in and see what happens…
Powering on
Let’s reach to the back of the device and flip the ON/OFF switch to ON. The moment of truth!
Ok, the LED and the digital readout are on. That’s a good sign. Looks like we wired and soldered all the components together correctly. Whew!
We’re getting an error, though. Ah, yes, we need to plug in a thermometer!
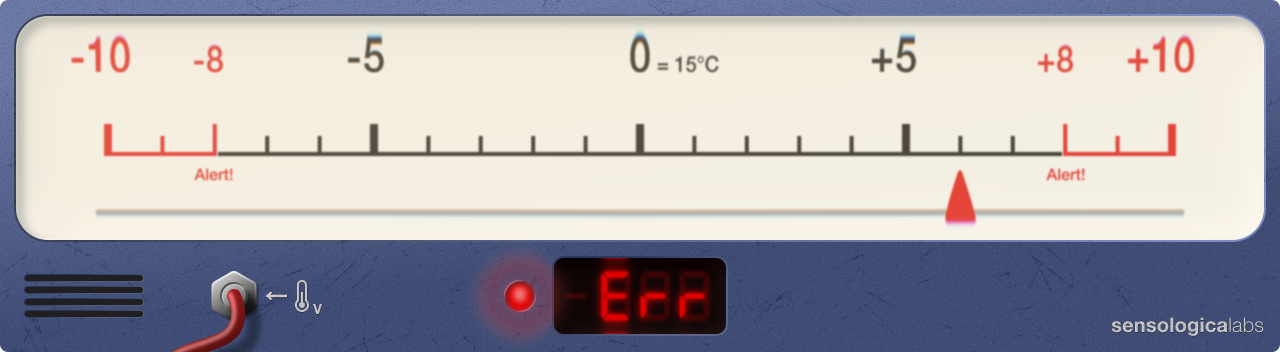
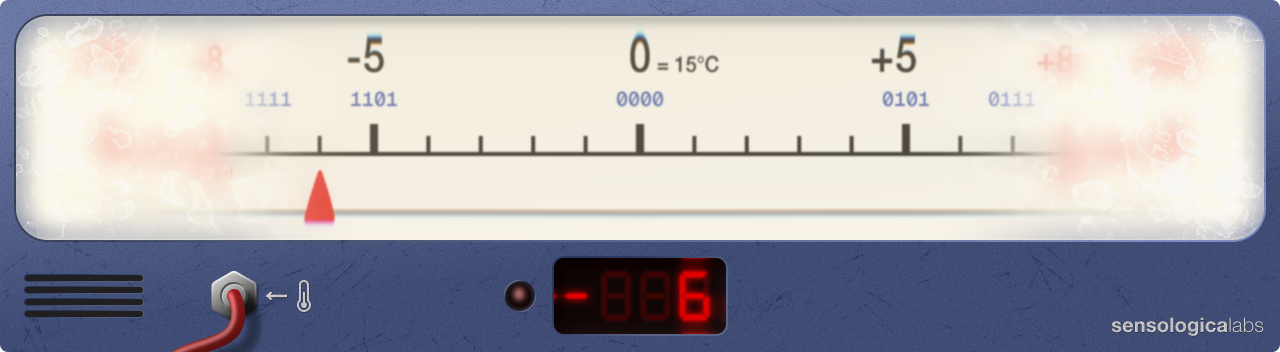
The thermometer is plugged in and working fine. The needle is now correctly showing +6, which (we do a quick convertion) is equivalent to 21°C, which in turn matches the temperature on the thermostat in our lab.
So why are we still getting an error? Of course! We need to program the digital readout, otherwise it doesn’t know what to show!
Programming the digital readout
The digital readout component is very old. We found two of them in some dusty box in our father’s garage a few years ago. Our father says they are from ‘85. Both still work! They sure don’t make them like they used to anymore!
Programming this digital readout is easy. You hook it up to a computer with a cable and load onto it a simple lookup table that tells the readout what each decimal number is in binary. The digital readout only understands binary, so we need to feed it binary data. If the readout does not find binary data for a decimal number in a table, it will simply show an error (“Err”) for that number.
This digital readout is very old and has limited memory, so it allocates only 4 bits per number. We learned earlier that we can represent 16 values with 4 bits. The deviation we need to represent is 8 in each direction, meaning 8+8 or 16 total, right? So we have enough! Perfect!
We construct a convertion table to upload to our digital readout. It’s almost identical to Table 1 from earlier, but note that in the binary column we now give each number exactly 4 bits of memory to conform to the specification of our digital readout because the readout will be expecting 4 bits per number, even if some of those numbers could theoretically be encoded using less bits.
| Decimal | Binary (4 bits) |
|---|---|
| 0 | 0000 |
| 1 | 0001 |
| 2 | 0010 |
| 3 | 0011 |
| 4 | 0100 |
| 5 | 0101 |
| 6 | 0110 |
| 7 | 0111 |
| 8 | 1000 |
| 9 | 1001 |
| 10 | 1010 |
| 11 | 1011 |
| 12 | 1100 |
| 13 | 1101 |
| 14 | 1110 |
| 15 | 1111 |
We save our table, click “Upload”, and wait.
Uploading…
While the table is uploading, we begin to feel concerned. 16 numbers is not a whole lot, huh. We can hardly do any meaningful calculations with such a small range. We wonder, what if we had 8 bits (a byte) per number? How many numbers in total would we then be able to represent before we run out of bits?
| Decimal | Binary (8 bits) |
|---|---|
| 0 | 00000000 |
| 1 | 00000001 |
| … | … |
| 3 | 00000011 |
| … | … |
| 7 | 00000111 |
| … | … |
| 15 | 00001111 |
| … | … |
| 31 | 00011111 |
| … | … |
| 63 | 00111111 |
| … | … |
| 127 | 01111111 |
| … | … |
| 255 | 11111111 |
We can represent 256 numbers with 8 bits before we run out of bits. Not bad, we can now perform calculations that reach greater values as our range is quite a bit wider.
We can continue to throw more memory at the problem if we want to increase the range of decimal numbers we can represent in binary.
If we increase our memory allocation to 32 bits per number, we will be able to represent numbers from 0 to 4,294,967,295, inclusive. Almost large enough to represent our bank account balance. We chuckle at our joke, alone in our dark lab.
If we increase our memory allocation to 64 bits per number, we will be able to represent numbers from 0 to 18,446,744,073,709,551,615, inclusive. Now we’re talking!
One can dream… But our upload has completed and we are back to our 4-bits/number readout. Limitations breed creativity, right?
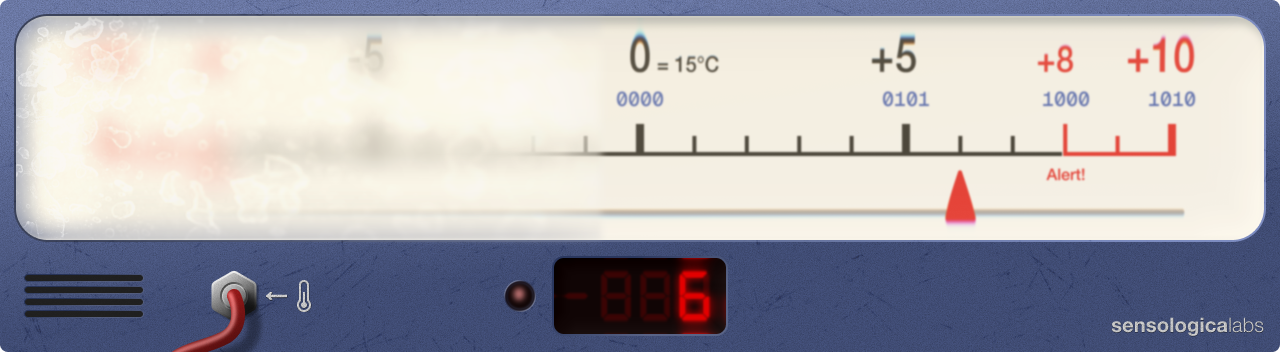
To make it easier to troubleshoot our digital readout, we mark binary values from the convertion table under the decimal numbers on the gauge’s scale.
So far so good. 0 is 0000, 5 is 0101, 8 is 1000, and 10 is 1010. Our digital readout is reading the conversion table correctly and is correctly displaying 6 on its display.
Wait a minute…
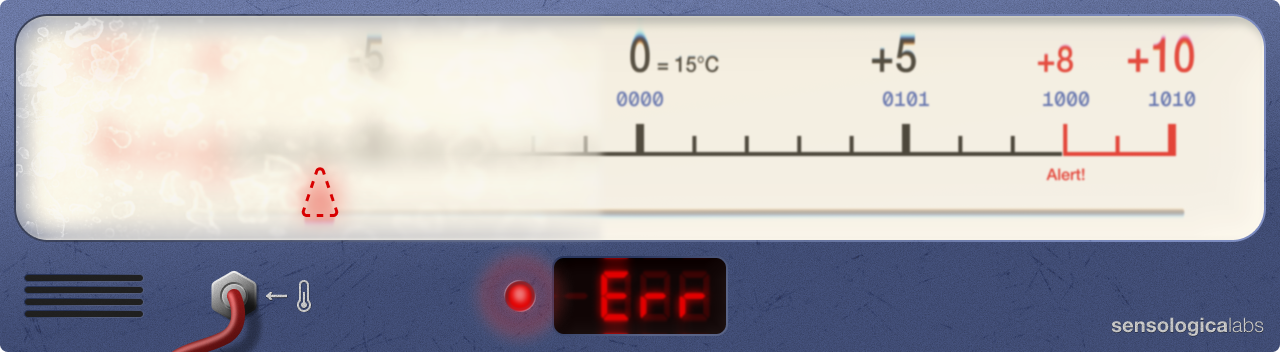
Dang it! There is a problem.
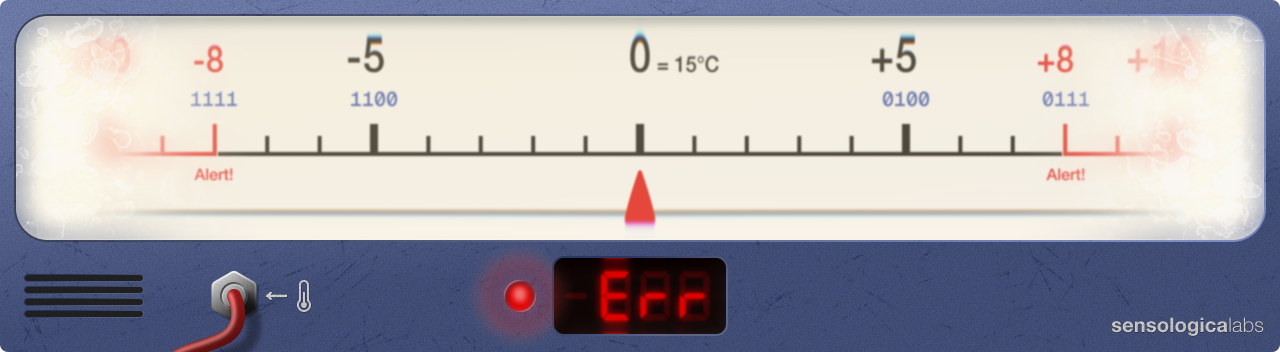
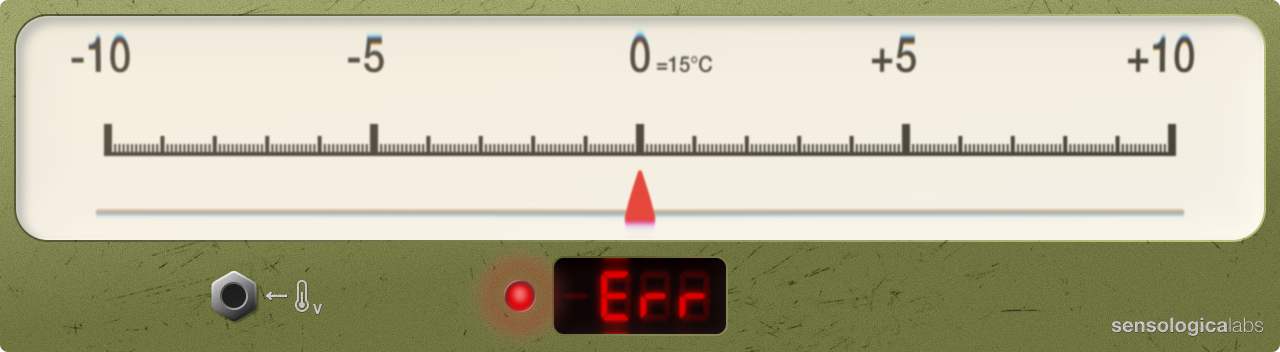
If temperature starts moving in the negative direction and drops below our reference temperature of 15℃, our analog gauge’s needle will follow, but our digital readout will throw an error because we haven’t told it how to represent negative numbers. In doing our translation from decimal to binary we forgot to account for negative numbers!
Signed integers
So far we’ve worked with only whole numbers, also known as natural numbers. These are numbers that represent discrete, whole, positive entities that we can count in the physical world. 2 cars. 5 apples. 10 fingers. Whole numbers from 0 to infinity in steps of 1.
But to make our temperature deviation gauge actually useful, we now need to consider integers. Integers are a superset of natural numbers. In other words they are natural numbers but also their negative counterparts. -2, -5, -10, 0, 1, 4, 7, etc. Integers range from -∞ (negative infinity) to +∞ (positive infinity) in steps of 1.
Okay, so how can we encode negative decimal integers in the binary format? Computers only understand 0 and 1. They don’t understand a minus sign. And our digital readout has only 4 bits per number. We have only 4 pairs of 0s and 1s to work with. It’s not much at all. We have no choice but to dedicate one of the 4 bits of each number to representing whether the number is positive or negative. Let’s dedicate the first (leftmost) bit to this purpose.
Thus, if this bit is set to 0 it will mean that the number is positive. And if it’s set to 1 it means the number is negative.
This is a viable solution, but it comes with an important tradeoff: we now only have 3 remaining bits for representing the actual numbers. This means our range will shift and while we will still be able to represent 16 discrete values, we won’t be able to reach as far up or down the scale as before.
| Decimal | Binary (4 bits) |
|---|---|
| -7 | 1111 |
| -6 | 1110 |
| -5 | 1101 |
| -4 | 1100 |
| -3 | 1011 |
| -2 | 1010 |
| -1 | 1001 |
| -0 | 1000 |
| 0 | 0000 |
| 1 | 0001 |
| 2 | 0010 |
| 3 | 0011 |
| 4 | 0100 |
| 5 | 0101 |
| 6 | 0110 |
| 7 | 0111 |
This fixes the error we were facing when the digital readout of our gauge was unable to display negative numbers. But now we have a new problem. Because the range has been shifted to encompass negative integers, this range is now unfortunately is capped at [-7, 7] and is too small to reach -8 and +8 numbers. This is a problem for us because we want our gauge to alert us when temperature drops or rises by 8℃ from our reference temperature of 15℃ pinned to 0 on the gauge.
Frustrated with our failed attempts to build a working gauge we decide to take a break and go to the lab-adjacent kitchen to make a tea. As we sit and sip our vanilla rooibos we recall a peculiar detail that we didn’t pay much attention to in the midst of troubleshooting our device, but now it’s bothering us:
What the heck is -0?!
Negative zero
Back at the lab we look at the Table 3. There it is, the -0 and its binary representation 1000. It feels like a useless value. Zero is zero! Zero is an absence of value. So how can a zero be negative? Well, it cannot, but encoding a -0 in binary gives us a symmetrical range in either direction.
To hell with symmetry! If we had 2 extra bits we’d be able to build a useful gauge! It occurs to us: what if we stole the bits currently dedicated to 0 and -0 and used them instead to extend our range to our very important -8 and 8? -0 is useless, and 0… Well, we can just have the digital readout show an error when the needle is at 0. We don’t really care when the temperature is exactly at reference. It’s the deviation value that we care about, and most importantly when the deviation value exceeds 8 in either direction. So we will steal bits from unimportant parts and use them where they will matter!
Excited by this breakthrough we remap our decimal-to-binary representation as shown in the table below.
| Decimal | Binary (4 bits) |
|---|---|
| -8 | 1111 |
| -7 | 1110 |
| -6 | 1101 |
| -5 | 1100 |
| -4 | 1011 |
| -3 | 1010 |
| -2 | 1001 |
| -1 | 1000 |
| -0 | |
| 0 | |
| 1 | 0000 |
| 2 | 0001 |
| 3 | 0010 |
| 4 | 0011 |
| 5 | 0100 |
| 6 | 0101 |
| 7 | 0110 |
| 8 | 0111 |
This is far from ideal. It’s confusing to see an error at 0, even when the device is performing as expected. But the scientists need this device by yesterday, and engineering is all about tradeoffs, so hopefully they will understand this limitation while we attempt to find a better solution.
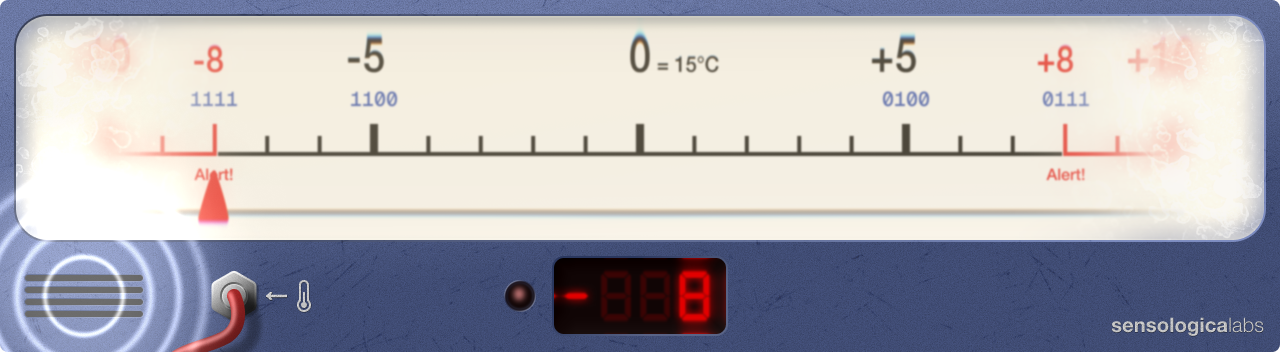
But on the bright side, the device will now alert the entire lab if the temperature has deviated too far, which is what’s really important.
The scientists find a compromise
After using the device in the biolab for a week, the scientists come back to us with a potential solution. Well, not really a solution but rather another compromise slash tradeoff.
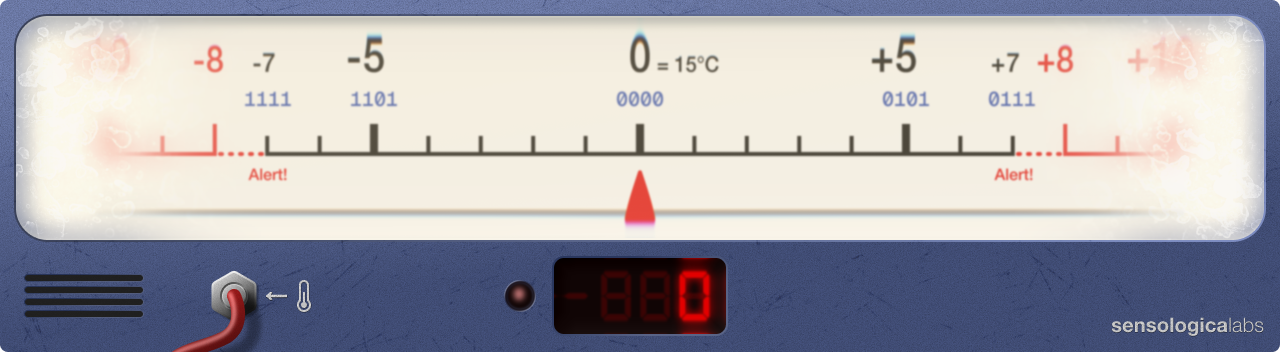
They say that it might be even better if we configure the device to sound the alarm before the temperature actually reaches the limit. Perhaps the alarm can sound when the temperature is 1°C away from the limit. This will give the scientists an advance warning to adjust the temperature. The analog needle will still show the exact deviation, if that information is necessary. The advantage of this tradeoff is that in this way we could get rid of the confusing error when the needle is at 0, and still have enough bits to reach -7/+7 and sound the alarm.
We say ok! Easy change. We just have to upload the Table 3 to the digital readout and slightly modify the scale by shifting the “Alert!” labels to be under -7/+7. And we also need to place the binary numbers at the extremes of the range above -7/+7 instead of above -8/+8 for correctness. And we can now also label 0 decimal on the scale with 0000 binary to reflect that this number, too, now has an encoding in binary.
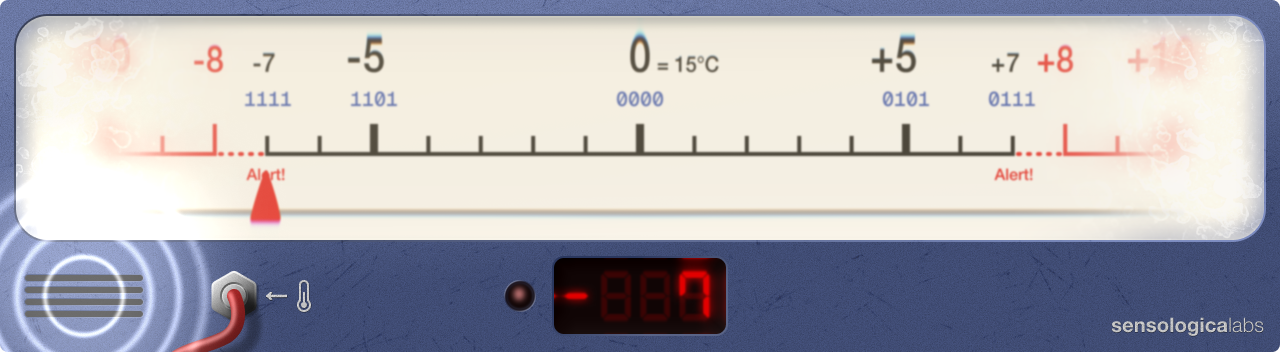
Sweet compromise!
Back to floating point
At this point you, my patient reader, might be wondering what does any of this have to do with floating point? No modern computers use 4 bits for numbers and why did we need the temperature gauge example?
Well, consider those examples preliminaries necessary for being able to understand the next, more complex layers of the subject. 4-bit numbers were a great way to illustrate the limitations of encoding decimal values in binary. And the temperature gauge example was meant to appeal to visual learners and to demonstrate some practical implications and to expose the interesting interplay between the continuous spectrum of the real analog world and the fragmented discreteness of the digital world — the boundary across which engineers work all the time.
It’s this latter part that is particularly interesting and particularly challenging. In the real world, things propagate in an infinite continuum. A car does not vanish from point A and appear at point B without traveling the distance between point A and point B. The analog needle of our gauge does not jump from 0 to 1. It travels from 0 to 1, covering the distance in-between. This is why integers are not enough if we want to measure distances in smaller increments. Integers are not sufficient for representing the reality in between them. Too much important information is lost.
This doesn’t mean they are not useful, but it does mean that there is more to the story. This is where floating-point numbers make an appearance.
To approximate the infinite continuum of life, we can subdivide the space between integers. If we need to establish a midpoint between 0 and 1, we can divide 1 (the step size from 0 to 1) by 2. This gives us a new type of number, 1/2, called a rational number (think ratio, not rationality). Rational numbers are a subset of real numbers — numbers that can be found anywhere on the continuum between -Infinity and Infinity, without a specific step/increment size between them. Thus, rational numbers are 1/2, 4/1873, etc.
Rational numbers can also be expressed using a decimal point, which would give us a floating-point number. Thus, 1/2 can also be written as 0.5. Recall that our number system is positional. By placing the 5 after the dot, we are essentially “demoting” it to a lower significance than the 0 preceding it. We are essentially giving it less weight. But if we start increasing the .5 by one, we will eventually reach .9 and will need to “roll over” into 1.0. The same rules apply.
In other words, 0 in 0.5 still has the weight of 10^0. The .5 on the other hand now has the weight of 10^-1.
So we get (0 x 10^0) + (5 x 10^-1) = 0 + 5/10 = 0 + 1/2 = 1/2 = 0.5
We need to take a small detour to understand this. What is a number raised to a negative exponent? Well, 10^-1 is the same as 1/10^1 which is the same as 1/10 (TODO: why is 10^-1 1/10?). Similarly, 10^-2 is the same as 1/10^2 which is the same as 1/100. And this makes sense. It’s essentially the continuation of the pattern we established earlier in this article but in the opposite direction, not towards greatness, but towards smallness. In the number 1111.1111, the leftmost 1 will carry the weight of 1000, while the rightmost 1 will carry the weight of 1/1000. Numbers more to the left make ever greater leaps in magnitude. Numbers more to the right make ever tinier leaps in magnitude. So the more numbers we have after the decimal point, the more finely we are fragmenting the space between any subsequent numbers to the left of the decimal point. The more finely that space is fragmented, the more accurately we can locate ourselves in that space mathematically. In other words, we get more precision.
The ever present challenge of translating decimal to binary
So now we have revisited what floating-point numbers are. We have the basic underpinnings that will allow us to move forward with more clarity.
We learned that by subdivinding the space between integers by using decimal points and adding numbers to the right of them we are essentially increasing the precision with which we can mathematically position ourselves on the myriad continuous fluctuations of magnitudes in life.
And how convenient that we now know how to increase precision, because our scientist friends, who were quite satisfied with out temperature deviation gauge and now asking us if we could build another similar device.
They says they don’t need this new device to alert them, but because their new experiment will have very low tolerances, the device will need to be able to give them a precision of 1/10℃ (or 0.1℃ if we express it using decimal point notation) and with a range from -10 to +10.
We love a good challenge, but we already had to drop values from our gauge to fit our measly -8 to +8 range with precision of 1. How could we possibly build this new gauge the scientists want? It seems impossible. We will certainly be needing more bits…
We tell the scientists we will have to do some thinking to see if it’s possible and we retreat to our lab, scratching our head.
We learned when building our first device that we can only represent 16 distinct values when we have 4 bits to encode our decimal numbers with. This new gauge would require us to encode, let’s see: -10 in one direction, each step subdivided into 10 steps, and the same in the opposite direction. This means we need to represent 100 values on either side of 0, for a total of 200 distinct values! 202, if we count 0 and our strange friend -0, which we should and will. We definitely need more bits. 4 is just not going to cut it and there is no way to hack around that large of a discrepancy in needed and representable range. But how many more bits?
Well, as we recall, we previously calculated that 8 bits can represent 256 values. Would that be enough? Let’s see, we need to reserve one bit for the sign, we know this now. We are learning from our mistakes. This leaves us 7 bits to represent values. With 7 bits we can represent numbers from 0 to 127. With the bit reserved for the sign, this gives us the range -127 to 127. That’s perfect! We will even have room to spare!
Before we get too excited, let’s check if our thermometer and the analog needle of our gauge are sensitive enough to give us the kind of precision that we need. We read the specs and yes, they are! The thermometer is sensitive to 0.1℃ and the needle can send appropriate voltage to the digital readout.
Only one issue remains… We need a new digital readout that will allow us to encode decimal numbers into binary like before, except this time using 8 bits per number.
It’s time to visit our hacker friend
Josie’s office door is always open but out of politeness and, frankly, out of intimidation, we knock before stepping into her space. Silver, Josie’s puppy notices us and rushes up to say hi. He jumps up and down, and wiggles his tail, and barks excitedly, and licks our hands. Josie, laughing, swivels in her chair to face us.
‘Silver, easy! Calm it down a notch, you crazy animal!’
We don’t mind. How could we mind such positive attention and in such a cute package?
‘Hey Josie. Sorry to bother, but you wouldn’t happen to have one of those digital displays lying around, would you? You know, the ones that you can upload a decimal to binary lookup table to?’
‘Ah, old school stuff. You’re talking about those old 5-digit 16-bit ones?’
‘I was thinking 8 bits.’
‘8? In that case your best bet would be to check the dumpster out back. Back in like 1980.’ She chuckles. ‘Your next best bet is that bottom drawer over there.’ She points to a drawer under a workbench that’s caving in under the weight of old computer books and low-res monitors stacked, or rather piled, on top of it.
We pull out a mini flashlight from our pocket and go rummage through the drawer. We emerge from the mess pinching a cable with a small digital display attached to it. It’s just like ours. “8b999” reads the sticker on the back. The sticker on the one in our lab says “4b999”. We’re in luck.
‘How much for the thing?’ we say.
‘You’re kidding. Nothing.’
‘Woof!’
‘Oh, Silver says it’ll cost you a pack of salmon treats. He’s the boss.’
‘Ha, good deal! I’ll see what I can do. See you next week?’
We wave bye to Josie and Silver and rush back up to our lab.
Hooking up the new display
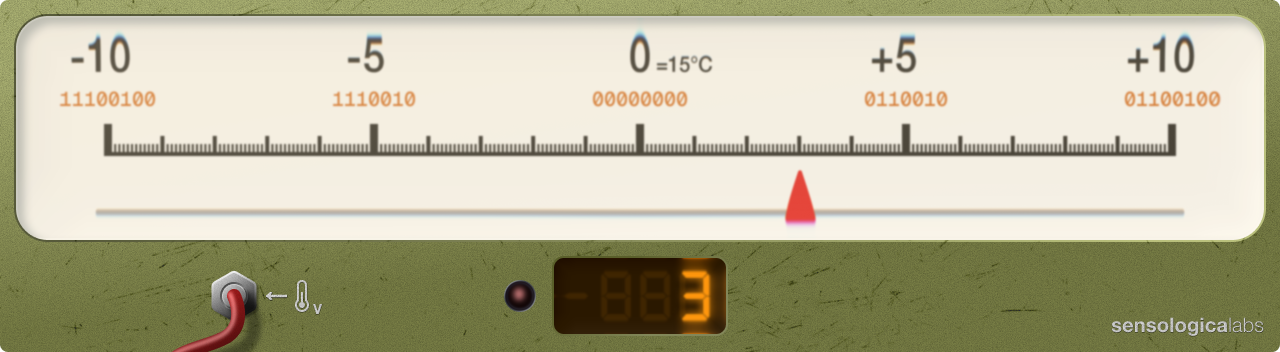
Back at our lab we’ve wired up the new display. Hey, it’s orange! We’ve made a copy of Table 4 and updated it so that every number is now encoded using 8 bits instead of 4 bits. This way our new digital readout that expects strings of 8 bits per number will be able to correctly parse the data we feed it. In the table we’ve also extended our range to reach -10 and +10 on our scale.
| Decimal | Binary (8 bits) |
|---|---|
| -10 | 10001010 |
| -9 | 10001001 |
| -8 | 10001000 |
| -7 | 10000111 |
| -6 | 10000110 |
| -5 | 10000101 |
| -4 | 10000100 |
| -3 | 10000011 |
| -2 | 10000010 |
| -1 | 10000001 |
| -0 | 10000000 |
| 0 | 00000000 |
| 1 | 00000001 |
| 2 | 00000010 |
| 3 | 00000011 |
| 4 | 00000100 |
| 5 | 00000101 |
| 6 | 00000110 |
| 7 | 00000111 |
| 8 | 00001000 |
| 9 | 00001001 |
| 10 | 00001010 |
Things are going smoothly so far, but we are far from done.
To be continued…